Battery switch on travel trailer function is crucial for managing your RV’s power. Understanding how this switch works—whether it’s a simple single-battery setup or a more complex dual-battery system with solar—is key to enjoying reliable power on the road. This guide will walk you through the different types of switches, common troubleshooting steps, safety precautions, and best practices for maintaining your travel trailer’s battery system.
We’ll cover everything from basic operation to integrating renewable energy sources, ensuring you’re prepared for any situation.
From understanding the wiring diagrams and the advantages and disadvantages of different switch types to mastering troubleshooting techniques and safety procedures, this comprehensive guide empowers you to confidently manage your travel trailer’s power. We’ll also delve into how the battery switch interacts with various power sources, including shore power, generators, and even solar panels, painting a clear picture of how your entire electrical system works together.
Troubleshooting Common Battery Switch Issues
So, your travel trailer’s battery switch isn’t cooperating? Don’t worry, it’s a common problem with straightforward solutions. This section will walk you through identifying the issue, testing the switch, and, if necessary, replacing it. We’ll cover the most frequent problems and their fixes.
Common Battery Switch Problems
Several issues can cause your battery switch to malfunction. These often stem from corrosion, loose connections, or a faulty switch itself. A switch that’s stuck in one position (either on or off) is a clear sign of a problem. You might also experience inconsistent power delivery to your appliances or a complete lack of power, indicating a problem with the switch or its connection to the batteries.
Sometimes, the problem isn’t the switch at all, but rather a loose connection somewhere in the wiring.
Troubleshooting Steps for a Non-Functional Battery Switch
Before you start tearing things apart, let’s try some basic troubleshooting. First, visually inspect the switch and all connections for any signs of corrosion, loose wires, or damage. Clean any corroded terminals with a wire brush and baking soda solution. Tighten any loose connections. If the problem persists, you might need to delve deeper.
Check the fuses both in the switch itself (if applicable) and in your trailer’s fuse panel. A blown fuse is a common cause of power problems. Remember to always disconnect the negative battery cable before working on any electrical components for safety.
Testing the Battery Switch with a Multimeter
A multimeter is your best friend when diagnosing electrical problems. With the battery switch in the “on” position, measure the voltage across the switch terminals. You should read a voltage close to the battery’s voltage (typically 12V for a 12V system). If you read zero volts, the switch is likely faulty or there’s a break in the circuit. Next, test the continuity of the switch.
Set your multimeter to the continuity setting (usually indicated by a diode symbol). Touch the probes to the switch terminals. A continuous beep indicates a good connection. No beep means there’s an open circuit within the switch itself. Remember to always follow your multimeter’s instructions carefully.
Replacing a Faulty Battery Switch
If your tests confirm a faulty switch, replacement is necessary. Begin by disconnecting the negative battery cable. Carefully remove the old switch, taking note of how the wires are connected. This is crucial for correct reinstallation of the new switch. Install the new switch, ensuring all connections are secure and tight.
Reconnect the negative battery cable and test your system to confirm functionality. If you are uncomfortable working with electrical components, it’s always best to consult a qualified RV technician.
Battery Switch and Power Management: Battery Switch On Travel Trailer Function
Your travel trailer’s battery switch is the central nervous system of your power distribution, acting as a gatekeeper for electricity from various sources. Understanding its function is key to maximizing your off-grid adventures and preventing electrical mishaps. It allows you to seamlessly switch between shore power, generator power, and your battery bank, ensuring a smooth power supply regardless of your location.The battery switch’s primary role is to direct the flow of electricity.
When connected to shore power or a generator, it allows these sources to power your trailer’s appliances directly, often bypassing the batteries entirely. This prevents unnecessary strain on your batteries and allows you to fully utilize the higher amperage of shore or generator power. Conversely, when you’re off-grid, the switch connects your appliances to your battery bank, providing power until the batteries are depleted.
Properly managing this switch is crucial for extending battery life and preventing unexpected power outages.
Battery Switch and Charging
The battery switch significantly impacts how your batteries charge. With the switch in the “off” position, your batteries are isolated from any external power source, preventing them from charging. In the “on” position, the batteries can receive a charge from either shore power or a generator, typically through a built-in charging system in your travel trailer. Some switches offer an intermediary position that allows charging without powering the appliances.
Understanding these settings is vital for maintaining optimal battery health and preventing overcharging or undercharging, both of which can shorten their lifespan.
Power Flow in a Travel Trailer System
Imagine a flowchart where shore power/generator power enters at the top. This power is first routed to a converter which transforms the AC power into DC power for the batteries and 12V appliances. Then the power flows to a distribution panel. From the distribution panel, the power is directed to the various 12V appliances in your trailer, such as lights and water pumps.
This path is usually through a fuse box or circuit breaker for protection. The battery switch controls whether the power flows directly to the appliances or goes to the batteries first. If the switch is set to “batteries”, the power first charges the batteries and then supplies power to the appliances. If the switch is set to “off”, the power goes directly to the appliances from the shore power or generator.
If the switch is in the “charging only” position (if available), it will charge the batteries without powering any appliances.
Best Practices for Maintaining Your Travel Trailer’s Battery System
Maintaining your travel trailer’s battery system is essential for reliable power and a longer lifespan for your batteries.
- Regularly check the battery terminals for corrosion and clean them with a wire brush and baking soda solution.
- Ensure your batteries are properly secured and adequately ventilated to prevent overheating.
- Periodically test your battery voltage to ensure they are maintaining a proper charge.
- Avoid completely draining your batteries; this can significantly reduce their lifespan.
- Use a battery maintainer when your trailer is in storage to prevent sulfation.
- Consider installing a battery monitor to track your battery’s state of charge.
Following these best practices will significantly improve the longevity and performance of your travel trailer’s battery system.
Safety Considerations with Battery Switches
Working with your travel trailer’s battery system requires caution. Improper handling can lead to serious injury from electric shock, burns, or explosions. Understanding and following safety procedures is crucial to protect yourself and your equipment.Batteries, especially deep-cycle batteries commonly used in RVs, contain corrosive chemicals and store significant electrical energy. Even a seemingly “dead” battery can still deliver a dangerous shock.
Furthermore, the electrical system of your travel trailer involves high currents that can cause fires if not handled correctly. Understanding the risks associated with the battery switch and the entire electrical system is paramount.
Potential Risks of Improper Battery Switch Usage
Incorrectly using the battery switch can lead to several hazards. For example, accidentally leaving the switch in the “on” position while storing your trailer could drain your batteries, leaving you stranded on your next trip. More seriously, short circuits caused by loose connections or damaged wiring near the switch can generate intense heat, potentially igniting nearby flammable materials.
Improperly connecting or disconnecting batteries can also cause sparks, which could ignite explosive gases released by the batteries. Furthermore, working on the electrical system without disconnecting the power can lead to severe electric shock, potentially fatal.
Necessary Safety Equipment
Before working on your travel trailer’s battery system or electrical components, gather the necessary safety equipment. This includes heavy-duty insulated gloves rated for the voltage levels involved (typically 12V but higher voltages may be present in some systems), safety glasses to protect your eyes from sparks or battery acid splashes, and a non-conductive tool such as a plastic or rubber handled screwdriver to prevent accidental short circuits.
So, you’re an audiophile who travels? Awesome! Check out this guide on building the perfect audiophile travel setup to keep your ears happy on the go. It’s all about finding that sweet spot between portability and sound quality. And speaking of travel, don’t forget insurance! Before you jet off, make sure you’ve got solid coverage with Aon travel insurance – peace of mind is priceless, especially when you’re carrying expensive gear.
It’s also advisable to have a fire extinguisher rated for electrical fires readily available. Consider using a battery terminal cleaner to ensure good connections, which can help prevent sparking. A multimeter is helpful for checking voltage and ensuring circuits are properly disconnected.
Common Safety Mistakes to Avoid
It’s essential to be aware of common mistakes to prevent accidents.
- Failing to disconnect the negative (-) battery terminal before performing any work on the electrical system. Always disconnect the negative terminal first to prevent accidental short circuits.
- Working on the battery system or electrical components in wet or damp conditions. Water is a conductor of electricity and significantly increases the risk of electric shock.
- Touching both battery terminals simultaneously. This can create a short circuit, resulting in a spark or even an explosion.
- Improperly ventilating the area while working with batteries. Batteries release gases that can be explosive. Ensure adequate ventilation to prevent gas buildup.
- Ignoring warning labels on batteries and electrical components. These labels contain crucial safety information.
- Not wearing appropriate safety gear. Always use insulated gloves, safety glasses, and other appropriate personal protective equipment (PPE).
Battery Switch and Different Trailer Setups
Choosing the right battery switch for your travel trailer depends heavily on the type of trailer you own and your power needs. Different trailers have different power demands, impacting the size and number of batteries required, and consequently, the type of battery switch needed. Let’s explore how these factors influence your decision.
Battery Switch Setups in Various Trailer Types
Fifth wheels, toy haulers, and standard campers all have varying power requirements. Fifth wheels, often larger and equipped with more appliances, typically demand more power and may benefit from dual battery systems with higher capacity batteries. Toy haulers, with their focus on powering heavier equipment like ATVs, often need even more robust battery setups, potentially requiring multiple high-capacity batteries and a heavy-duty battery switch capable of handling the increased amperage.
Standard campers, on the other hand, may get by with a single battery and a simpler switch, depending on their size and features. The size and layout of the trailer also influences wiring considerations and the placement of the battery switch itself.
Battery Size and Capacity’s Impact on Switch Selection
The size and capacity of your batteries directly influence the amperage rating of the battery switch you’ll need. Larger batteries, such as Group 31 deep-cycle batteries, provide more power but also require a battery switch with a higher amperage rating to handle the increased current. For example, a dual-battery setup with two Group 31 batteries might require a 200-amp battery switch, while a single Group 27 battery might only need a 100-amp switch.
So, you’re an audiophile who travels? Awesome! Check out this guide on creating the perfect audiophile travel setup to ensure your ears are always happy on the go. And speaking of travel, don’t forget to sort out your insurance! Getting Aon travel insurance is a smart move for peace of mind, protecting your gear and yourself while you explore.
Proper planning makes for smoother journeys, both musically and geographically!
Always check the manufacturer’s specifications for your batteries and choose a switch with a sufficient amperage rating to avoid overheating or damage. Underestimating the amperage requirement can lead to premature switch failure.
Integrating Battery Switches with Solar Panels and Renewable Energy Sources
Integrating solar panels and other renewable energy sources with your battery system is becoming increasingly common. A battery switch plays a crucial role in this setup. The solar charge controller will charge the batteries, and the battery switch allows you to select which circuits are powered by the batteries (house bank) or the shore power. This setup enables you to use solar power to charge your batteries, extending your off-grid capabilities.
Proper wiring and the use of appropriate fuses and circuit breakers are critical for safety and optimal performance in this type of system.
Wiring and Functionality: Single vs. Dual Battery Systems
Single battery systems use a simpler setup. The battery connects directly to the battery switch, which then distributes power to the various circuits in the trailer. Wiring is relatively straightforward. Dual battery systems, however, involve more complex wiring. Each battery is connected to the battery switch, often using heavy-gauge wiring to handle the increased current.
The switch then allows you to select which battery (or both) powers the house circuits. This provides redundancy and increased capacity. A dual battery setup also often incorporates a charging system that can charge both batteries simultaneously, either from shore power or a solar panel system. Careful planning and execution of the wiring are paramount to avoid short circuits or other issues.
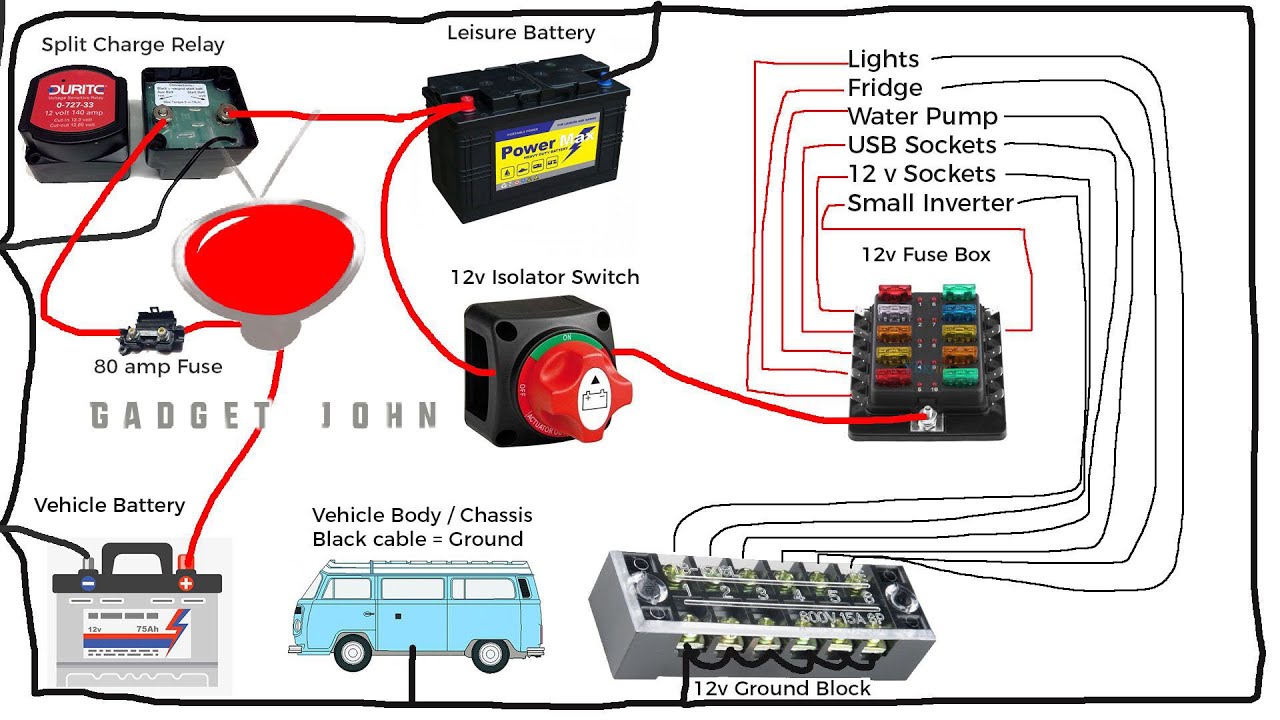
Visual Representation of Battery Switch Components

Understanding the physical makeup of a battery switch is crucial for proper installation, maintenance, and troubleshooting. This section provides a detailed description of a typical battery switch, allowing you to visualize its internal workings and connections.A typical battery switch is housed in a robust plastic or metal casing, designed to protect the internal components from the elements and accidental damage.
This casing often features mounting holes for secure attachment to a surface, usually within the travel trailer’s battery compartment. The switch itself is typically a relatively compact unit, often square or rectangular in shape.
Switch Terminals and Connections, Battery switch on travel trailer function
The external features of the switch are primarily its terminals. These are typically heavy-gauge, brass or copper posts, designed to handle significant electrical current. There will be at least two main terminals, one for each battery bank (in a dual-battery setup), and possibly a third terminal connected to the trailer’s main power distribution center. These terminals are often clearly labeled, perhaps with “+1,” “+2,” and “LOAD” designations, to indicate their function.
The terminals themselves may be threaded, allowing for the secure attachment of heavy-duty battery cables using nuts and washers. These connections must be kept clean and tight to prevent voltage drop and overheating. Some switches may also incorporate smaller terminals for accessories or monitoring devices.
Internal Workings of a Battery Switch
Inside the casing, the heart of the switch is a rotating selector mechanism. This mechanism is usually a sturdy, multi-position switch, typically operated by a lever or knob on the exterior of the casing. Each position of the switch corresponds to a specific circuit configuration. For example, one position might connect only battery 1 to the load, another position might connect only battery 2 to the load, and a third position might connect both batteries in parallel to the load.
The selector mechanism physically connects and disconnects internal heavy-duty copper conductors, effectively routing power from the batteries to the trailer’s electrical system. These internal conductors are often quite thick to minimize resistance and heat generation during operation. There are often internal spring mechanisms or detents to hold the switch firmly in each selected position. The internal components are designed to handle the current draw of the entire trailer’s electrical system without overheating or failure.
Mastering your travel trailer’s battery switch is essential for safe and reliable power management. By understanding the different switch types, troubleshooting techniques, and safety procedures Artikeld in this guide, you can confidently handle any power-related challenges on your adventures. Remember, regular maintenance and safe operating practices will keep your system running smoothly for years to come, ensuring your off-grid experiences are powered by confidence and knowledge.
FAQ Explained
What happens if I accidentally leave my battery switch in the OFF position?
Leaving the switch off will disconnect your house batteries from the trailer’s electrical system. You’ll lose power to appliances and lights running off the house batteries.
How often should I check my battery switch connections?
Inspect your connections at least twice a year, or more often if you notice any issues with your electrical system. Look for corrosion, loose wires, or damage.
Can I use a battery switch with a lithium battery?
While some battery switches are compatible with lithium batteries, it’s crucial to check the switch’s specifications to ensure compatibility. Improper use could damage the battery or the switch.
What size breaker should I use with my battery switch?
The appropriate breaker size depends on the amperage of your battery system and the wiring used. Consult an electrician or your RV’s manual for the correct sizing.
